Linked Banner

People Who Leave A Great Impression On Us

Monday, September 30, 2013

Celebrating our new look with some Blog Candy!!

Hello Friends!

Are you as tickled with our new look as we are?
To celebrate we are giving away a little blog candy - Woot Woot!!

But first let's talk about the new blog.  We have added pages to make it easier for you to maneuver around.  Looking for a new technique to try?  Now you can find all of our tutorials in one spot just in case you missed one.  We have our Monthly Challenge rules posted on another page with a badge for our winners to grab.  You will want to check it out as our challenge rules have changed.  Our newest stamps are waiting for a peek under "What's New."  Then click "Shop" where you will find our newest stamps and hundreds more! We pride ourselves in having something for everyone on our 
Great Impressions Stamps store website.

And what's a blog post without a little creative inspiration (grin!)


I used F553 Stitched Flower for my baby card.  
This stamp works well with so many different occasions.  I stamped the flowers three times on Echo Parks  - Bundle of Joy Dots and Stripes (girl) which we also carry in our store.  I then fussy cut the flowers out and adhered them to my card.   For fun and extra dimension I added a tulle bow tied with some pretty twine.  A die cut and some sparkly sequins finish it off.  An elegant baby card with a bit of a shabby feel  is now in my card stash for that next girl or boy.

Alright, who wants to help us celebrate our new look with some 
BLOG CANDY??!
All you have to do is click on "What's New" at the top of this page and choose your very favorite image and sentiment. Then tell us the names of your choices in a comment and they could be yours!  
We have two places where you can leave your comment: 

Facebook
This Post

Share with your friends!  
More comments means more prizes to give away!
You have until Friday at Noon (Eastern Time)
Winner(s) will be announced Sunday, October 6th.

Have a very crafty week friends!

Hugs,

Jenny

Saturday, September 28, 2013

Fall Farm Friends

My name is Danni and I am so honored today to be the guest designer for Great Impressions Rubber Stamps

For my card today I chose some autumn stamps as I just love autumn!! I used Fall Farm Friends and then colored them with copics. 


On the inside I decorated it by stamping the Fall Farm Friends again in colored ink and then stamping the Handpicked Sentiment in a dark ink. A strip of patterned paper and voila' a nice inside.


A big thank you to Great Impressions Rubber Stamps for having me as a guest! 


Friday, September 27, 2013

Spooky Tree Tag

     I have been having tons of fun making up Halloween tags for party favors this week and thought I share a favorite with you.  This tag uses the Spider Tree stamp to great effect.  The tag itself was colored with the direct to paper method using distress inks.  Then I accidentally spilled a glass of water on it.  When the tag tried it was awesome, perfect for Halloween.  I was always told accidents are an opportunity for art and boy did that saying prove true.

I stamped the spider tree in black Versafine ink so I could get really good definition of the spiderwebs.  Next, using a black marker, I colored in the base of the tag to ground  the image.  Clear Stickles were used on the webs only.  The entire tag was then sponged with more black ink and I punched a few tiny bats out using a corner punch and added them to the scene.  Lastly, I added some neat Halloween colored fibers and a ribbon.

Mary Anne

Thursday, September 26, 2013

Black Magic

Greetings, ghoulish friends!  It’s another tutorial week here at Great Impressions and I've got another spooky technique to share with you!  This week it’s BLACK MAGIC!!!  Hopefully you've got the supplies you’ll need to try this technique.  If not, hop to it! ;)

You’ll need these supplies ready for this week’s technique~

  • G433 Witches Brew
  • E767 Bubble Over
  • Black cardstock
  • White pigment ink (or chalk ink)
  • Heat gun (optional)
  • Colored pencils or crayons
  • White gel pen
  • Papers and embellishments to finish your project
 Here’s the gift box I’ve made~
(Front then back)


And here’s the tutorial~


Thanks for stopping by to take a peek at this eerily fabulous technique!  I hope you’ll grab these amazing images if you haven’t already and don’t forget to get supplies ready for our next technique—Watercolor Emboss Resist!

Here’s what you’ll need for that technique~

 Join me again next Thursday for another project using fabulous images by Great Impressions Rubber Stamps!  HUGS and haunting stamping friends!


Wednesday, September 25, 2013

3's a Crowd!

Hi everyone Monica here to share another Great Impression card.  I used these adorable Reindeer Trio who obviously are the best pals.. They are just too cute!


I made these flower with some flower dies


Thanks for stopping by everyone and check out the Monthly Challenge here there is still a few days left to get your entries in and remember we love seeing Great Impression stamps!


Monday, September 23, 2013

How beautiful

Hello friends! Giovana here bringing you a very CAS card with a great message. I think these Floral Frame and How Beautiful sentiment work together perfectly. Recently, I purchased the True Friends Paper from Carta Bella and this paper is the fantastic!

For my card I cut the patterned paper 3.75" x 5", added Banana and Acqua Dolce Gelatos to the edges, blended them using my fingers. I stamped the frame in Jet Black Archival and the sentiment in Olive Archival, colored the little flowers with Prisma color pencils and added White Liquid Pearl to all the center. Finally I added 3 red pearls to bottom corner.
The card base is white, A2 size.


Hope you like it!!
Have a fantastic day!

Saturday, September 21, 2013

Wintery Snowman

Good morning!

I have a super cute holiday care to share with you today, featuring two Great Impressions Stamps: Wintery Snowman and Peace and Happiness. The gorgeous diagonal striped patterned paper and star stickers are from Echo Park. I used Copic markers to color in the snowman's hat and scarf, then accented the snowflakes with clear Stickles. I love the subtle shimmer the Stickles add to the card. So pretty and perfect for the holidays!

 
I hope my card inspires you to pull out a favorite Christmas image and get started on your holiday cards. And there is still time to participate in this month's Great Impressions Stamps challenge. You can find out all the details here.

Have a wonderful weekend!  

Erin.

Friday, September 20, 2013

Autumn Riches

     I am really feeling fall today.  We've actually had a few days of cool weather here in St. Louis, not many but I'll take what I can get right now.  Today's card has everything I love about fall in it; abundant harvest bounty, rich colors and falling leaves.


  The beautiful Harvest Wagon is filled with fall's bounty. I think it is an image that speaks to many of us with it's country wheelbarrow full of fruits and vegetables and the wonderful foliage of fall all being collected for a harvest celebration  The image is colored with pencils and OMS and then sponged with Old Paper Distress Ink for an older country feel.  The paper leaves are embossed with a spider web folder and then sponged with distress ink to give them a look of leaf veins.   The many layers and bits and pieces echo the bounty in the wagon.

Mary Anne


Thursday, September 19, 2013

"Boo!": Ghost for "Hello!"

So, are we all in the Halloween mood yet?!  I know I am!  The weather is getting the teeniest bit cooler and I am ready for sweaters and cider!  I've got a perfect "just because" card today that you could send to a friend around Halloween.  I'm calling is "Ghost for 'Hello!'".  Sometimes I name my cards...don't you?! ;)  The stamps I used are found in the Great Impressions store, so hop over and grab them while you can!

Here's the card~

Products used: E730 Cobweb Phone, A135 Boo!.

You guessed it, "BOO!" is Ghost speak for "Hello!".  I love holidays because it's a great time to let loved ones know you're thinking of them--even at Halloween! :)

Don't forget to come back next week for another eerie Halloween titled technique!  We'll be learning a little BLACK MAGIC!

You’ll need these supplies ready for the next technique~


  • G433 Witches Brew
  • E767 Bubble Over
  • Black cardstock
  • White pigment ink (or chalk ink)
  • Heat gun
  • Colored pencils or crayons
  • White gel pen
  • Papers and embellishments to finish your project
That's all for me this week, friends!  HUGS and haunting stamping! :)


Wednesday, September 18, 2013

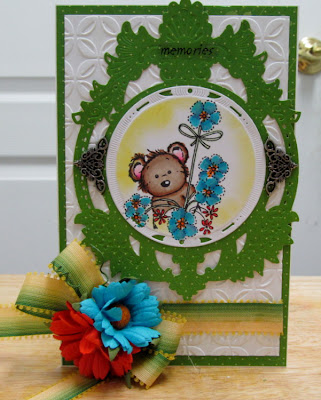
Memories - Teddy w/Flowers

Hi everyone Monica here to share another Great Impression stamp post.  Today I am using one of the newest releases from Great Impression Teddy with Flowers

I added some mulberry paper flowers to brighten things up more


I hope everyone enjoyed my post for today and be sure to check out our latest challenge at Great Impression and you could win!

Products Used:


Tuesday, September 17, 2013

Gelato Tag


Hello Crafty Friends!

Today I wanted to try stamping with Gelatos.  Mynnette  did a wonderful video tutorial on it a few weeks ago.  The only problem I had was that I own only two Gelatos.  I won them in a challenge and they have been hiding in my stash ever since!  So I dusted them off and got busy.  I used a distress marker for the butterfly as I only had a blue and a green Gelato.

Supplies


So now I have a unique tag fit for any occasion.
For full instructions check out Mynnette's tutorial.

Thanks for taking a peek today!

Hugs,


Monday, September 16, 2013

Happy Fall

Hello friends!! Giovana here with another Fall project. For today's project I used this cute image "Pumpkin Patch Patty" , isn't she cute?!


Here are the details:
  • Stamp image on White Cardstock in Memento Luxe Tuxedo Black, add clear embossing powder and heat set.
  • Color image with Markers (Here Copic markers used)
  • Die-cut and emboss image with Circle Nestabilities.
  • Die-cut a swirl top.
  • Make card base from Tomato Soup Cardstock (5" square)
  • Cut a panel from White Textured Cardstock. (4.75" square), adhere a piece of Patterned paper, add lines around the edges with a fine black marker, add swirl top and image with dimensionals.
  • Create a double bow with bow-easy and adhere it to card.
  • Create sentiment with Alphabet stickers.

Remember we have our monthly challenge going on, the theme is "Colors of Fall" and you can find all the information HERE

Hope you like my project.
Have a fantastic day!

Giovana

Saturday, September 14, 2013

Guest Designer Carolyn LaBille: Merry Kiss Moose


Hi Great Impressions crafty folk and followers. My name is Carolyn (aka Ms Petunia) and I am your guest designer for the day!  I have created 2 items, a card and tag, that would be perfect to send out for the holidays or even just for fun.
I found designing with the Great Impressions stamps super easy. The stamps are clear, crisp and very graphic, all the criteria for creating a successful project. 

My first item is a fun little holiday card that uses a super cute stamped image.
This image, Merry Kiss Moose, is so gosh darn cute! I'm a big fan of anything to do with cute animals and Great Impressions literally has pages and pages of cute animal stamps to choose from.

My recipe is as follows: Craft paper from my stash & watercolor paper by Canson. Dies cuts are Grapevine Wreath  by Memory Box and Lacey Circles by Spellbinders. The red circles are made by using an old fashioned circle punch. I used Colorbox Pigment Ink in white then embossed it with a white embossing enamel.  I colored up the image with Distress Inks in Tea Dye, Vintage Photo, Pumice, Stormy Sky & Aged Mahogany. I added Stickles to the ornaments in Turquoise, Firefly and Magenta.

My next item is a cute little holiday tag, "Jingle". I used the same die Grapevine Wreath and circle punch, then  also matched the embossing on the edges and sentiment . I added some Stampendous Glass Glitter in green.  To keep the ensemble matched each project has a nice festive ribbon purchased at Michaels along with the ever need adhesives.
I hope you like my project, I was super excited to be asked to be a guest designer! One day I hope to make the design team and be able to inspire all the crafty Great Impressions peeps.

Have a crafty day!
Carolyn

Friday, September 13, 2013

Autumn Elegance

   On my tag today, I have used one of my favorite Great Impressions stamps, Romantic Collage.  This is a incredibly versatile stamp.  I like to use it to create background papers, cut it apart and use it as embellishments and design elements and as I have today use it as the focal image.


     I started with a plain packing tag and got busy with some acrylic paints and dye inks.  The first thing I did was to use a direct to paper method with my ink.  After that dried, I dry brushed cream acrylic paint.  The next layer was some stippled gold paint.  After my background dried completely I put it threw a embossing folder backwards so that it was debossed.  I drew in the lines, added some dark pearls to the cross sections and use some Stickles lightly in the fleur de lis.  I also used some distress ink around the edges to darken them just a bit.

     Next came the image.  For this tag, I stamped the image three separate times and then layered and popped the layers.  All are colored with Prisma pencils and edged with black stickles.  Finally, I rummaged through my stash of charms and chose a couple that I felt complemented the image.

     The final step was to add the ribbon.  It didn't look quite right tied so i wired it together at the top and added a final charm over the wire.   By the way,  the charm at the top is a piece of a dollar store bracelet.  Dollar stores are great places to find charms.

Mary Anne

Thursday, September 12, 2013

Ghost Masking

Haunted greetings to you, friends!  I know it’s only September but I’m going to share with you some deliciously spooky creations in my ghastly tutorials this month!  Okay, is the Halloween talk too much?  I’ll stop.  Except to say that this week’s tutorial is GHOST MASKING!!!

Here’s the supply list for this week’s  technique~

 Here’s the card I made~


And here’s the tutorial~

Thanks for stopping by to take a peek at this super fun technique!  I hope you’ve enjoyed the tutorial and that you’ll grab the supplies for it if you haven’t already.  Don’t forget to grab the supplies that you’ll need for my next eerily awesome technique as well!  Next time you’ll be learning a little bit of BLACK MAGIC!

These are the supplies you’ll need for that technique~

  • G433 Witches Brew
  • E767 Bubble Over
  • Black cardstock
  • White pigment ink (or chalk ink)
  • Heat gun (optional)
  • Colored pencils or crayons
  • White gel pen
  • Papers and embellishments to finish your project
Join me again next week for another project using some other wonderful images from Great Impressions!   HUGS and happy stamping friends!


Wednesday, September 11, 2013

Dear Lizzy

Hi everyone Monica here to share a Great Impression stamps card I made using Dear Lizzy.  I thought I would try coloring in red this time.  I love red, but always seem to have difficulty getting the red just the right tone.  I think I am getting better though, lol!  I totally love this stamp it is a perfect size and super easy to color.  I like to use stamps that are bold, kind of hard to explain though.

I made these roses with a Cherry Lyn die it comes in small - large.

I then added a wood butterfly I had to balance the card some.


I actually used copics and Spectrum pens to color.  Lizzy's skin is colored wiht Spectrum's.  For me I am very heavy handed so the bullet tip works good, but I love the brush tip of the copic.  Especially with the Great Impression stamp I chose.  

I hope everyone enjoyed my post and thanks for stopping by - don't forget we have a new challenge for the month of September!! CHECK IT OUT...

Simply Monica

Tuesday, September 10, 2013

Lovely Flowers

Good morning!

Today's card features an adorable stamp from Great Impressions called Watering Can of Flowers. I colored in the watering can and flowers with Copic markers before adhering the die cut to my card. The beautiful patterned paper is from October Afternoon's Woodland Park collection.


(Supplies - Stamps: (Great Impressions) Watering Can of Flowers. Ink: (Memento) Black. Cardstock: (PTI) Ocean Tides, Rustic White. Dies: (PTI) Notched Star Banner Die, Mat Stack #4. Markers: Copic. Enamel Dots: (My Mind's Eye) Halloween Collection. Patterned Paper: (October Afternoon) Woodland Park. Ribbon: (October Afternoon) Woodland Park.)

For this card I picked out the patterned paper first, then colored in the watering can and flowers to match. 

That's it for me today! Have a great week and thanks for stopping by. :)


Monday, September 9, 2013

Fall Thinking of you

Hello ladies and gents! I am sorry for posting this a little later, I have had a very hard week, actually the last 2 weeks have been really difficult, but here I am with a cute Fall card.

For my card I used Fall Garden image. I stamped it on White cardstock in Memento Luxe Tuxedo Black and added clear embossing powder and heat set. Then, I colored it with Copic Markers. The image was die-cut, embossed and stenciled with Square Nestabilities. The sentiment is from Sweet Sentiments, I just used the "Thinking of you" one. The BG paper is from BoBunny. I added pearls and Gold Gala Glitz to the sunflowers.


Hope you like it!!
Have a fantastic day!
Giovana

Saturday, September 7, 2013

Merry Wreath

Good morning!

Erin here. I have my very first Christmas card to share with you this morning, using Great Impressions' Merry Wreath stamp.

I stamped the image using Memento Ink, then colored it in with Copic markers. I added a die cut heart to the center using text paper, then a button with twine. The wreath is a gorgeous stamp and I didn't want a lot "stuff" distracting from the beautiful image, so I omitted a sentiment on the outside. I can add one to the inside when I'm ready to send it.

(Supplies - Stamps: (Great Impressions) Merry Wreath. Ink: (Memento) Black. Cardstock: (PTI) Spring Moss, Always Artichoke, Cream, Scarlet Jewel. Patterned paper: Papertrey Ink. Dies: Wplus9.)

Have you started creating your Christmas cards yet? I am excited to work on mine this year... I have so many beautiful Christmas stamps that I can't wait to ink up! 

Have a wonderful weekend and thanks for stopping by!

Friday, September 6, 2013

Asian Autumn

     Today I bring you a rather different autumn card.  I used J97 Asian Scenery to help me create this simple  Japanese style card.


    This lovely Asian landscape was colored with colored pencils and odorless mineral spirits.  This is my favorite way to color up a card and one I almost always use. The cloud filled sky is chalk inks sponged around a cloud shaped template.  I added White paint pen to create the snow cap for Mt. Fuji as well as ripples in the water.  The Tree is given sparkle and dimension using stickles.

     Since this gorgeous stamp can stand on it's own and Japanese art is usally very clean and simple I did not add any embellishments to the card.

    Don't hesitate to check out our shop where we have a number of wonderful Asian stamps.

Mary Anne


Thursday, September 5, 2013

More Autumn Colors

Hello again, friends!  It's Mynnette here again with another card made with a beautiful and simple sentiment from the Great Impressions Rubber Stamps store!  Since autumn is almost here and our monthly challenge is to create something with autumn colors, I thought I would share another card using these shades.

Here's my card~

Products used: H92 "Get Well Prayer", E320 Delicate Leaf BranchBundle of Joy Girl Paper, My Mind's Eye Enamel Dots.

Thanks so much for stopping by to take a peek at my card!  Do come back next Thursday when I'll be sharing another video tutorial!  The technique is called "GHOST MASKING"--very scary and Halloweeny!

Here’s the supply list for next week’s  technique~


That's all for me this week!  HUGS and happy stamping, friends! :)


LinkWithin

Related Posts Plugin for WordPress, Blogger...